Elementor for WordPress - 10 step guide

In this guide, you will learn everything about Elementor and Elementor PRO. At the end of the guide you will also find a WordPress guide.
How to use Elementor

How to use Elementor: Comprehensive guide for beginners (2023)

Table of contents

Are you interested in creating an amazing website?

Well, here’s the good news… It’s now easier than ever! There’s no need to manually code each page from scratch or hire a team of professionals.

These days, all you really need is a plugin called Elementor. It’s one of the most versatile and accessible WordPress page builders on the market.

Even better, it’s completely free to get started!

In this Elementor tutorial, we’ll walk you through how to use Elementor step by step and explore some of its best features.

Ultimately, you should have everything you need to create an impressive WordPress website in no time at all!

1. Installing Elementor in WordPress

Elementor is a popular page builder that pairs well with lightweight WordPress themes. This page builder lets you control every aspect of the look and layout of your website’s pages and posts, with dozens of widgets adding functionality through a clean drag-and-drop interface.

Now, keep in mind that Elementor itself isn’t a WordPress theme — it’s a plugin. This is important because you will still need to choose a dedicated theme to handle other aspects of your website.

Once you’ve installed WordPress and chosen a theme for your site, there are a few different routes you can take to install the Elementor page builder:

1. Installing Elementor in WordPress

Visit the Elementor website and get the free version of Elementor. The download button is prominently displayed at the top of the homepage.

After entering your email, your browser will automatically download the ZIP file.

How to download Elementor

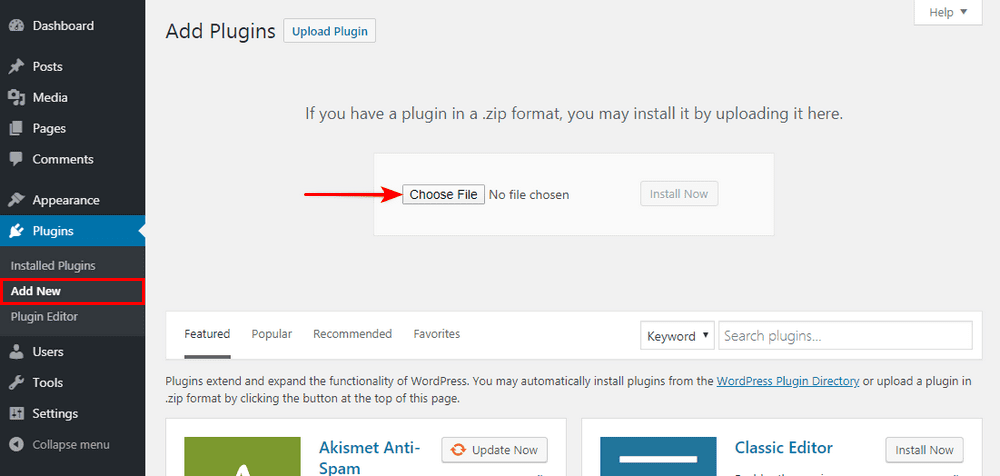
Then, go to the “Plugins” section in the backend of your WordPress website, click on “Add New,” and upload the .ZIP file to your website using the “Upload Plugin” button at the top.

Plugin

Once installed, simply click “Activate,” and you’re good to go!

Method 2: WordPress Dashboard

Log in to the backend of your WordPress website and prepare to install the plugin by clicking on “Add New” from the Plugins section.

To find Elementor, simply type the word “Elementor” in the plugin search bar.

Elementor Page Builder should pop up immediately as the first plugin option to install.

Dashboard elementor

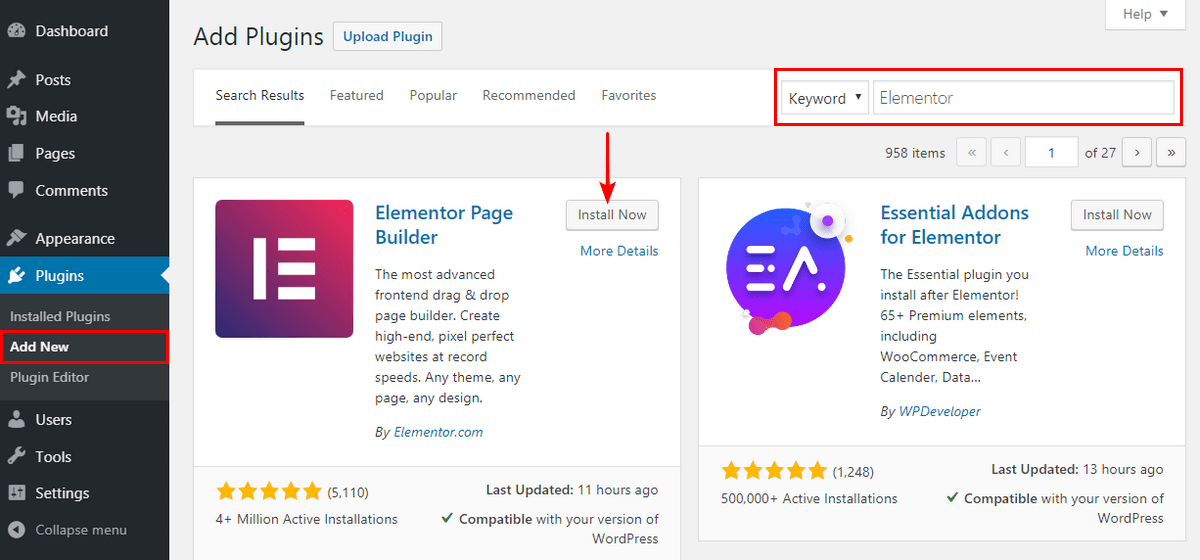
Simply click “Install” and then “Activate” once the plugin is downloaded, regardless of the method you chose to install Elementor.

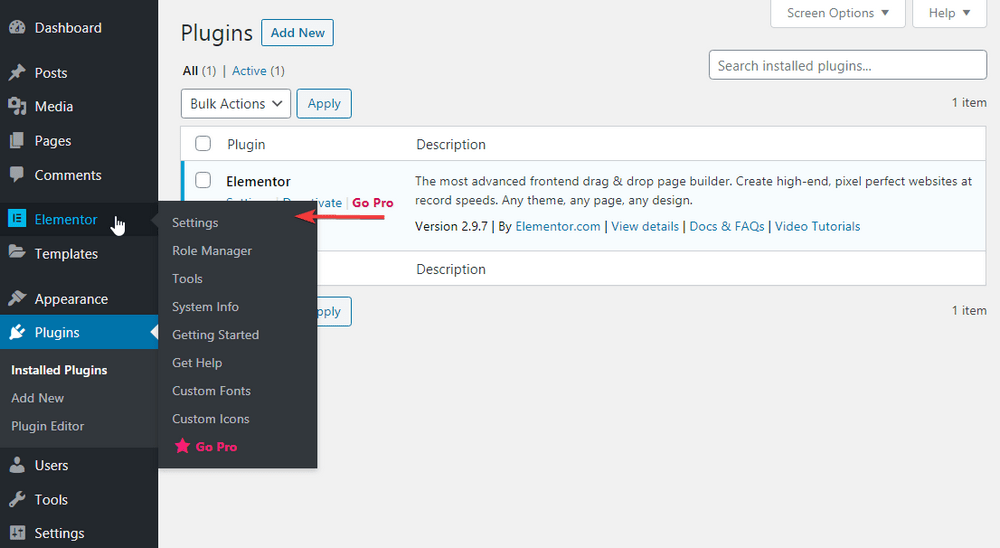
Whichever method you choose to install Elementor, you’ll be able to find it in your list of installed plugins from now on, and it will also have its own entry in the side menu.

From this area, you’ll be able to adjust the plugin settings.

installing Elementor guide

Unlike many plugins, Elementor’s primary functionality occurs within the pages themselves.

This means you’ll spend the majority of your time with Elementor when creating or editing pages and posts.

2. Exploring Elementor's options

We’ll soon delve into creating our own pages and templates with Elementor, but first, let’s take a high-level look at the options you have with Elementor!

One of the most crucial features of any page builder is ease of use. You should be able to jump in and turn your vision into reality without complicated and frantic YouTube searches.

Fortunately, Elementor is one of the easiest page builders we’ve ever used. It’s a visual editor, which means you can see precisely how the page will look as you work on it.

Once you get the hang of the drag-and drop process of adding modules to the page and adjusting properties in the sidebar, you’ll find it very intuitive. Most of the customisation options you’ll find in Elementor are based on the widgets that come with the plugin.

Elementor settings

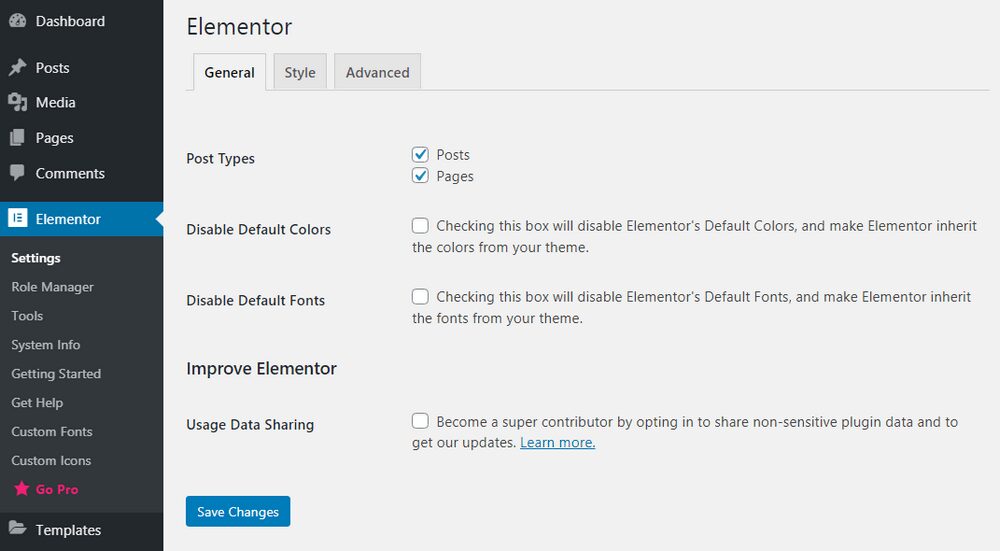
Elementor has a handful of high-level settings you can access directly in the plugin. This allows you to do things like controlling which types of posts Elementor works on, setting default fonts and spacing, and fine-tuning the settings.

Elementor settings

Elementor also includes a handy role management feature that allows you to categorise which types of users can access the editor (note: this is a feature available only in Elementor Pro).

What gadgets are Included?

In general, Elementor is built around a drag-and-drop editor that includes sections, columns, and widgets.

The system is broken down as follows:

  • Sections – Containers for columns and widgets.
  • Columns – Sections that contain widgets.
  • Widgets – Individual elements on the page.

Elementor widgets

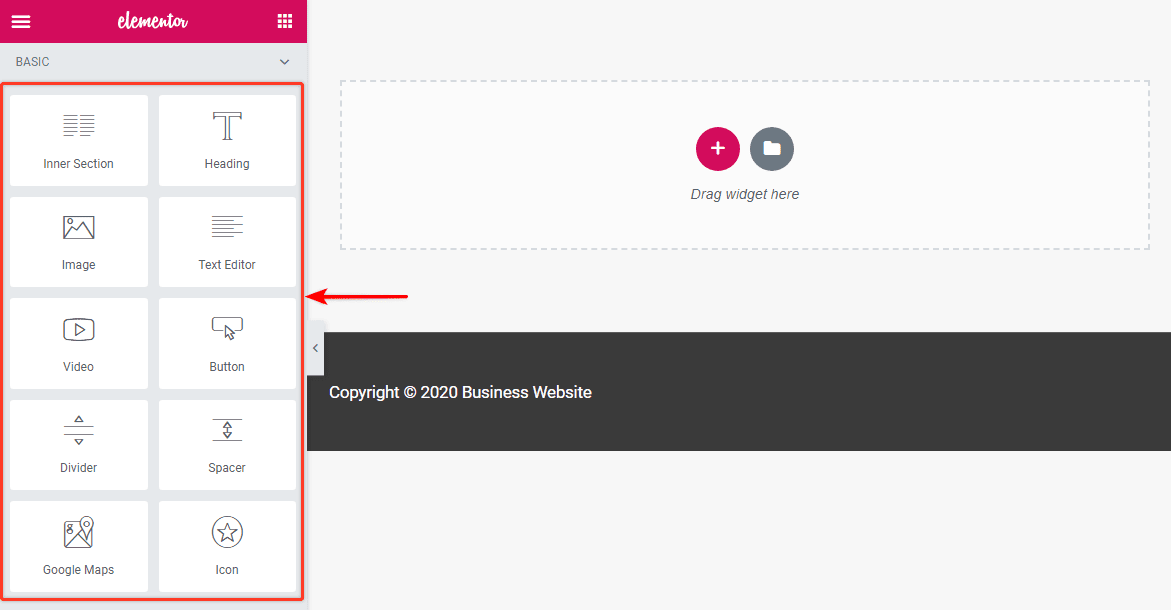
These widgets are simple content categories that allow you to customise your web page. In the free version of Elementor, you get access to basic elements.

Here’s a quick list of a few basic widgets you’ll often use:

  • Heading
  • Image
  • Text Editor
  • Video
  • Button
  • Divider
  • Icon
  • Google Maps

You get nearly 30 basic elements that provide everything you need to create a functional web page.

Simply drag a copy of the widget onto the main page and customise it to fit your needs.

If these basic elements aren’t sufficient, you can acquire additional widgets by upgrading to Elementor Pro.

However, we argue that most of what you can do in Pro is possible in the free version; it just takes more time.

It’s up to you whether you need premium widgets found in the Pro version.

Here’s a quick excerpt of the dozens of widgets available in Elementor Pro:

  • Portfolio
  • Form
  • Flip Box
  • Pricing Table
  • Blockquote
  • Call to Action

These Pro elements will help make your site look smoother and more professional, and they’re also designed to support e-commerce efforts, including deep integration with WooCommerce.

We created a short article on creating contact forms with Elementor Pro; check that out!

Finally, Elementor supports third-party widgets.

You can find an abundance of third-party Elementor plugins that further expand your available widgets or even develop your own widget with developer resources from Elementor!

Not sure if you want to add extra widgets?

While it can be convenient to have widgets for everything you want to do on your website, it’s not absolutely necessary. There are still countless free third-party WordPress plugins that work well in tandem with Elementor and your WordPress theme.

3. Elementor Free vs. Elementor Pro

If you want a powerful free page builder tool that’s more feature-rich than many paid options, then Elementor is a great choice! – Tweet

Comparative feature table of Elementor

That said, Elementor Pro adds several desired features to expedite your workflow and provide even more control over the look and functionality of your website.

Theme builder plugins, premium widgets, and global elements are nice to have, but you certainly don’t need them to make a great website.


Elementor Free

Elementor Pro

Price

Free

Starts at $49 per year per site

Number of widgets

25+

50+

Page builder

Theme creator

X

24/7 support included

X

Dynamic content

X

Professional templates and blocks

X

Integrations

X

This is a general snapshot of the differences between the two versions.

Elementor Pro pricing

If you’re considering getting one of the paid versions of Elementor Pro, you should keep in mind that all three plans offer the exact same features!

The only difference between the Pro plans is how many licenses you buy at once.

Pricing of Elementor Pro

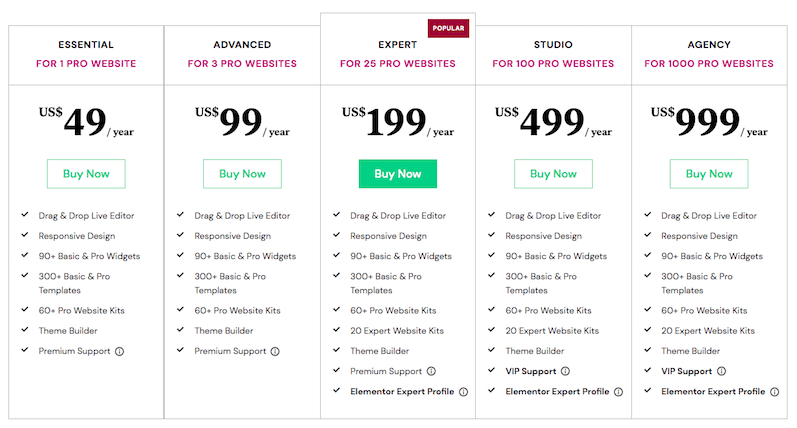
  • With Essential, you get Elementor Pro for one website for $49 per year.
  • With Advanced, you get Elementor Pro on 3 websites for $99 per year.
  • With Expert, you get Elementor Pro on 25 websites for $199 per year.
  • With Studio, you get Elementor Pro on 100 websites for $499 per year.
  • With Agency, you get Elementor Pro on a whopping 1,000 sites for $999 per year.

Which one is right for you? For individuals or small teams, Expert is definitely the best value as long as you’re likely to run more than one website with Elementor Pro in the next year.

You can always choose to start with Essential and upgrade to Advanced or Expert later if you decide you like Elementor and want more licenses.

4. How to use the free Elementor Page Builder

So, are you ready to see Elementor in action?

This page builder works with custom post types and comes with numerous pre-designed templates to choose from. For this guide, let’s go through the process of starting from scratch.

Step 1. Create a new post or page

Navigate to the WordPress dashboard of your website and click on “Add New” under either “Posts” or “Pages.” For this tutorial, we will create a new blog post.

Step 2. Edit with Elementor

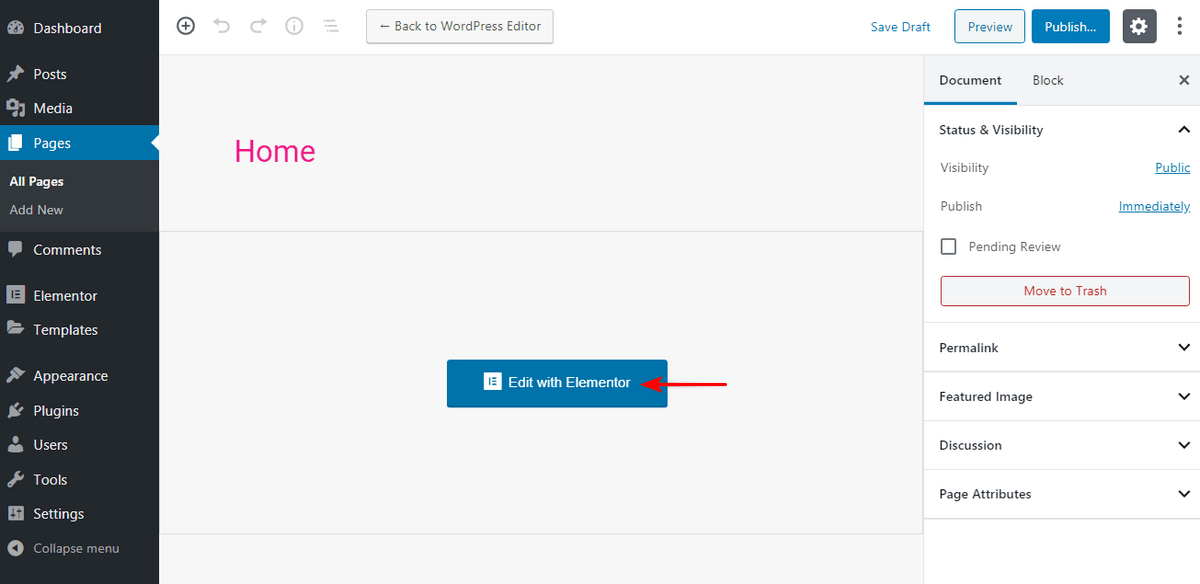
Once you reach this screen, you can choose to edit the page with the default WordPress editor. To use Elementor, click on the “Edit with Elementor” button.

Edit-page-with-elementor

Step 3. Building your page

Initially, this page will be blank. Select and drag elements from the Elementor sidebar.

Let’s create a new title for the page. All you have to do is click on the box that says “Title“, then hold down the mouse button and drag it to the widget area of the page (where it says “Drag widget here” [see video]).

Added video in column

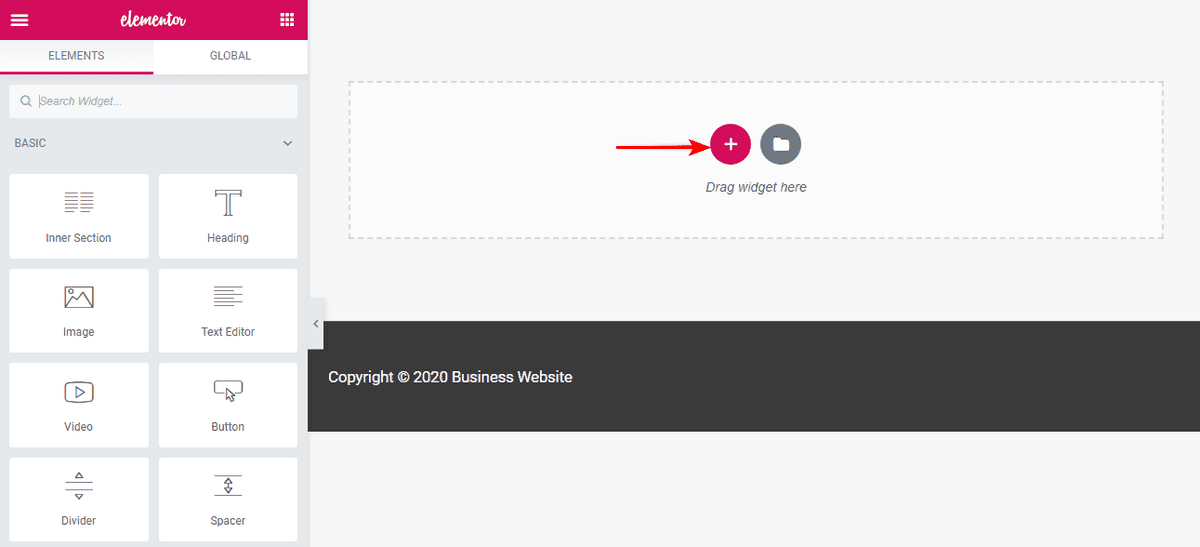
If you don’t want this element to take up the entire width of your page (which it does by default), you can click the little ” plus – + ” button to customise the structure of this section of your page.

Add-widget-to-the-page

After clicking on the plus button, you will see a “Choose your structure” option. Let’s go with three equal columns.

Elementor-columns-layout

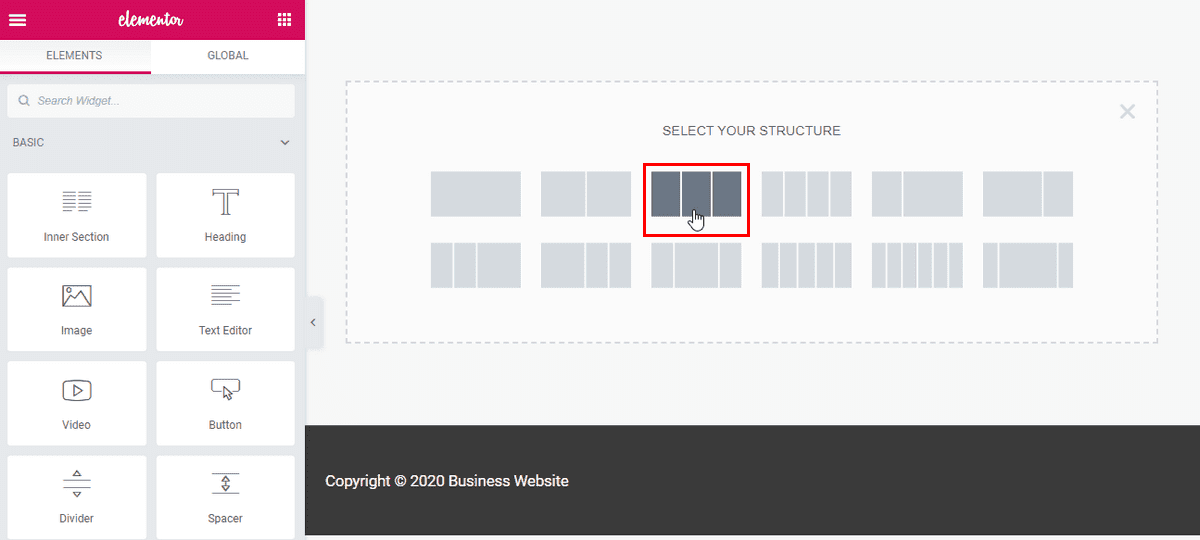
After clicking on that icon with the three columns, we now see a brand new tab on the page with three columns, each with a plus button.

Edit-elementor-column-layout

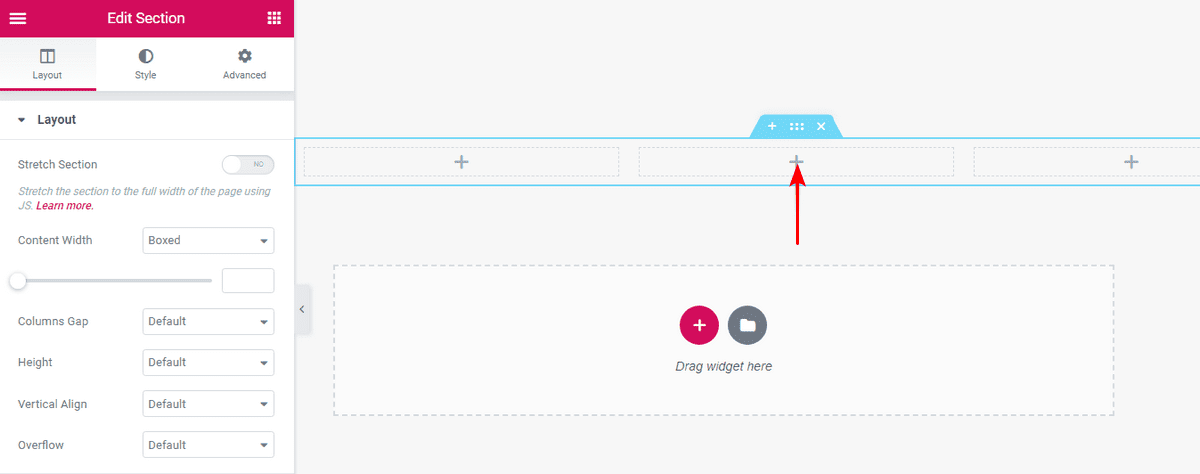
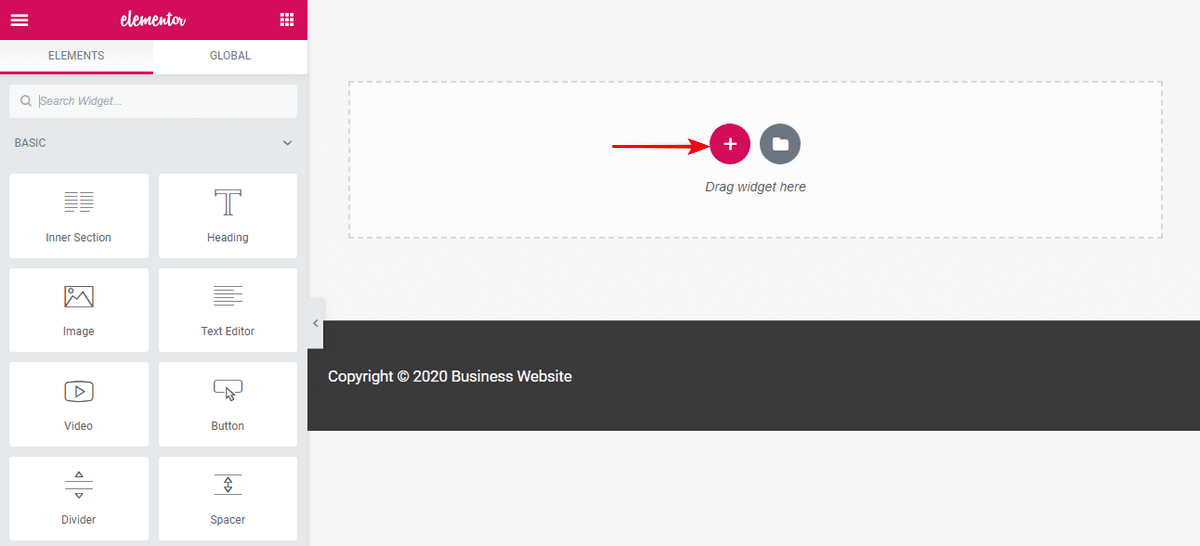
And if we want to customise what we see in this section? You guessed it, we’re moving a widget there.

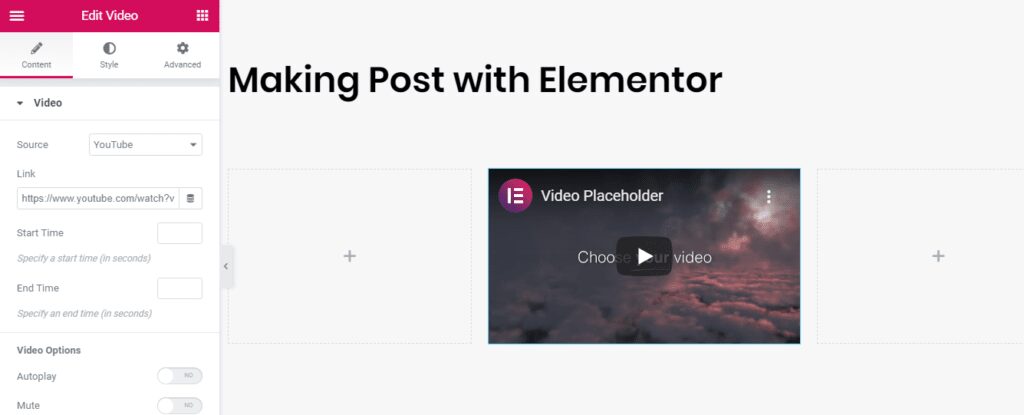
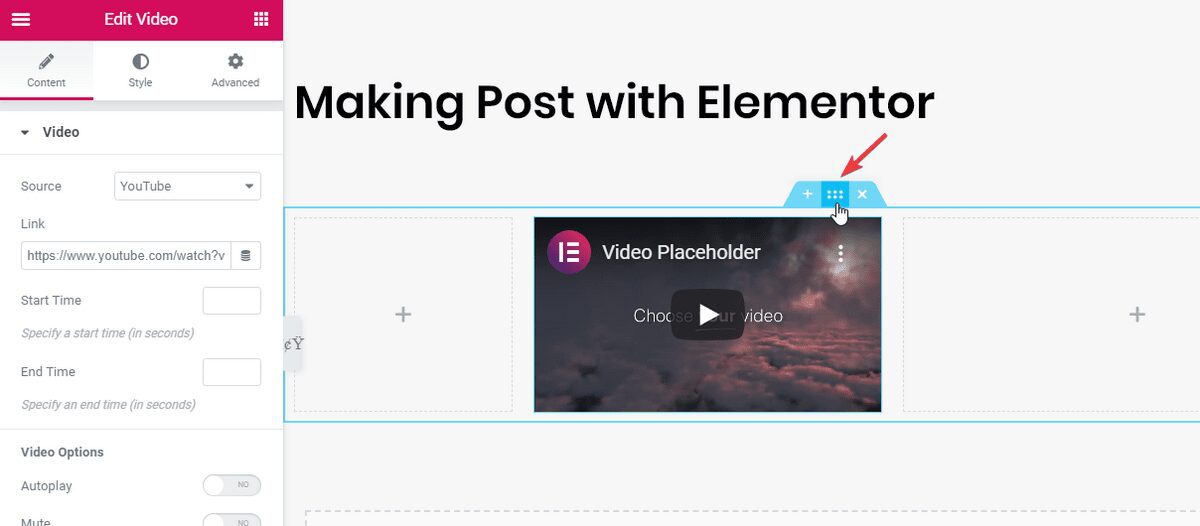
We’ve downloaded a video element in the middle column, which by default is preloaded with an Elementor video playlist.

Added-video-in-column


Step 4. Edit the settings

For each section or element you place on the page, you have options for further customisation. Just look for the six dots.

Edit-Elementor-section

If we choose the title, for example, we can change its content, style or advanced features such as margins and footers, responsiveness, etc.

Step 5. Publish your page

Once you are satisfied with the settings, it’s time to check the finished product.

We saw how this page looks in the editor, but if we take a peek at the actual page view, we will see that it’s the same!

This is a great feature because it means that once the page you’re working on is live, you can be sure it looks exactly as it did while you were editing it. This is one of the most important features of Elementor.

Summary of the Page Builder

This was obviously a quick example, but it shows you how easy it is to place elements and make a functional website!

The takeaway is that you don’t need to be an expert to create a website with Elementor. With tons of templates to choose from, you should never have to start from scratch unless you want to.

Whether you choose Elementor Free or Elementor Pro, the nuts and bolts of the Elementor page builder are identical. Pro simply offers enhanced functionality through premium widgets to help you immediately with marketing, e-commerce, design, and integrations with other common tools like MailChimp and Adobe TypeKit.

It was a great decision to set up Elementor this way because you don’t need to learn anything new once you’re ready to.

5. How to use Elementor Theme Builder

Fortunately, Elementor is both easy to use and incredibly flexible, largely thanks to its Theme Builder.

Available in the Pro version of Elementor, the Theme Builder changes the game for anyone familiar with page builders because it allows you to create custom headers, footers, and other dynamic content for your website.

It even lets you override aspects of your WordPress theme, so you can keep what works and simply make the changes you want!

Why do you need dynamic content? Well, sometimes you might want to host a sales page that doesn’t have traditional header and sidebar, or you might want to keep a custom blog post layout that you can use every time you add a new post.

The possibilities are endless.

Create a header/footer with Elementor

Are you ready to create a custom header or footer with Elementor using the Theme Builder? Here’s how it’s done!

Step 1. Click on "Templates" in the WordPress dashboard

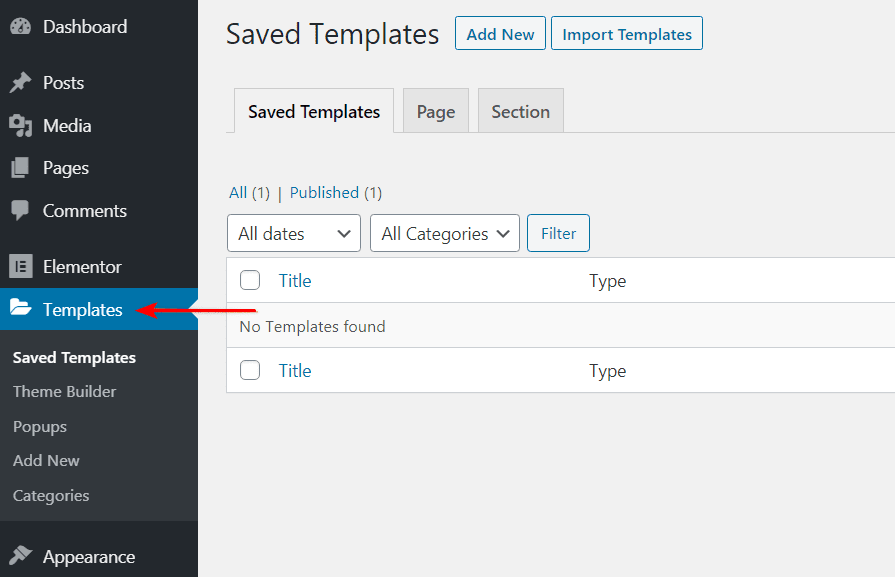
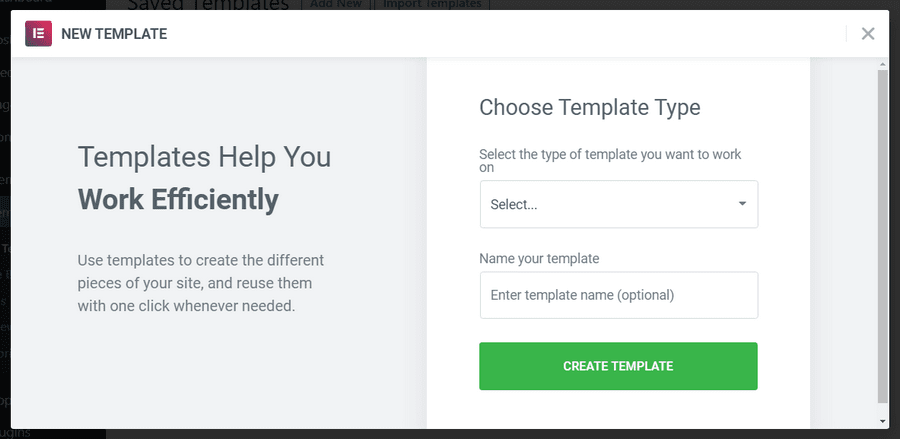
Once you’re in the WordPress dashboard, go to “Templates” under Elementor in the sidebar menu.

Templates

Step 2. Add new or import a template

This is where you create a new template for your header.

Add-new-Elementor-template-or-import

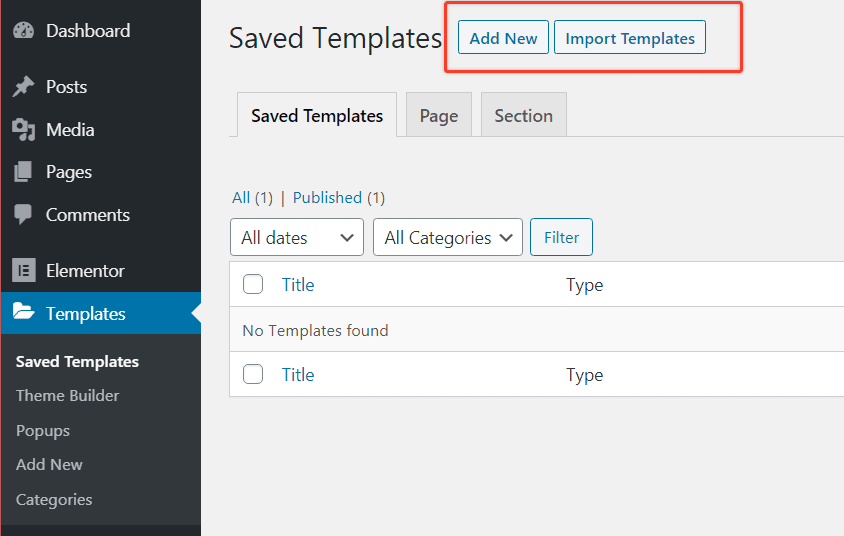
If you’ve already seen a template you like, you can import it to use as a starting point. Otherwise, click on “Add New.”

This will bring up a dialog box that lets you choose the template type, which is the header in this case, along with the name of your template.

Choose-Elementor-template-type


Note:

Elementor Free includes only section and page templates. The Pro version includes several additional template categories, including global widget, header, footer, single, and archive.

Step 3. Edit your new template

If this step looks familiar, it’s because it’s the same editor we used to create a whole page earlier.

You can go through the process to create your layout with various widgets and even specific images or other content. Once you save your new header, it’s easily accessible from a new page.

Elementor-template-edit-screen

Create WooCommerce pages with Elementor

The process of creating a customised WooCommerce product page is similar to creating any other page or section you can make. 

With its WooCommerce Builder, Elementor supports the ability to create a single product page template. Once you create a new template, you’ll see a library of templates filled with blocks or entire pages that you can use for your WooCommerce product page.

Keep in mind that this WooCommerce template will have a range of dynamic product widgets, including product title, product image, and product price.

You can configure product details with WooCommerce and use Elementor to display up-to-date product information on the front-end.

It’s that simple!

Best Addons for Elementor

In addition to these templates, we have a plugin called Ultimate Addons for Elementor that offers additional functionality not found in Elementor.

This goes even further than Elementor Pro in offering advanced widgets like content toggle, modal popup, content timeline, and more.

For maximum control and flexibility, it’s definitely worth checking out Ultimate Addons for Elementor!

6. How to create templates with Elementor

You can create templates for various sections and pages, including:

  • Page
  • Header
  • Footer
  • Single post
  • Blog archive
  • Product pages

For this example, let’s work with the page/post template.

Create a page template with Elementor

In Elementor, both pages and posts are covered by a “page template.” This is a saved template that you can use for any new page or blog post, allowing you to maintain consistency even when multiple team members create posts.

Even better, this is accessible to all Elementor users, including those with Elementor Free.

Step 1. Click on "Templates" in the WordPress dashboard

Once you’ve logged into the WordPress dashboard, go to “Templates” under Elementor in the side menu.

Elementor-templates

Step 2. Add a new template or import a template

This is where you create a new template for your header.

In the dialog box, select the type of page template and give your new template a name.

Then click on “Create Template” to start!

Step 3. Edit the page template

Just like earlier when we created our own page, you’ll use the same editor here. It’s as simple as creating new sections, changing columns, and dragging different widgets onto the page.

After designing a page that you like, you can save it as a template so it’s accessible for any of your other pages in the future.

7. How to create a popup in Elementor

Do you want to create a popup in Elementor? Perhaps to offer a free lead magnet to potential customers, deliver a message, capture leads, or something else?

Creating a popup in Elementor is quite straightforward. However, you’ll need to upgrade to the professional version to create popups.

The professional version provides some really great features, such as welcome mat popups, product sales popups, exit-intent popups, and more. So, we’ll go ahead and create a basic popup.

Just follow these steps to create a popup that triggers when a button is clicked:

  1. Go to Dashboard > Templates > Popups > Add New.
  2. Name your template and click on “Create Template.”

Choose-Elementor-template-type

  1. You can choose to create your own template or select one from the template library.

Ready-made-templates

  1. Click “Publish” when you’re ready. Then, save and close.
  2. Now, create a new page in Elementor and add a button widget.
  3. Under Layout, choose Link > Dynamic > Actions > Popup.

Choose-Elementor-popup

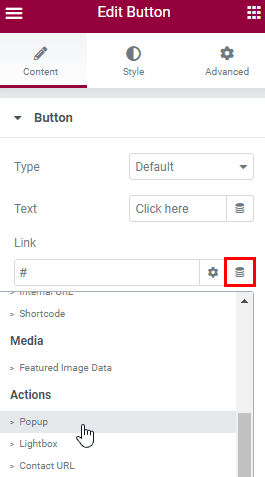
  1. Go to Popup > Open Popup and select the popup you just created.
  2. Click “Publish” when you’re ready, and preview the live page. Click the button to see your popup window.

And that’s how easy it is to create a popup window using Elementor!

8. Create a mobile-responsive website with Elementor

As more and more users visit websites from their mobile devices, having a space for the mobile view of your website is crucial. As mentioned earlier, over 50% of your website traffic comes from mobile devices.

We’ve outlined some steps to ensure that your website is mobile-friendly when using the Elementor page builder. 

Elementor makes it super easy when it comes to customising your website for different devices. 

The general rule is that all editable features have specific settings for desktop, mobile, and tablet. The most commonly encountered settings include text size, padding, and margin. 

For example, as shown in the image below, pay attention to the device icon next to “Width.” This is the case for almost every element you want to customise.

Elementor-mobile-responsive-options

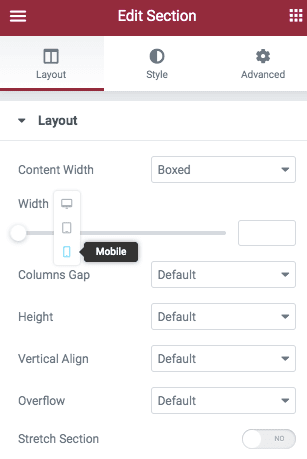
Click on the device for which you want to make customisation. After selecting, proceed and play with the settings based on your preferences. 

By default, background images are automatically responsive. You have full control over further customising images to fit your device, down to using different images for different screen sizes.

Did you know that you can choose to show or hide a section based on the device? For example, if there is a row of images or text that you want to hide on mobile devices, you can easily do that.

Simply go to the Edit section > Advanced > Responsive section.

Elementor-visibility-options

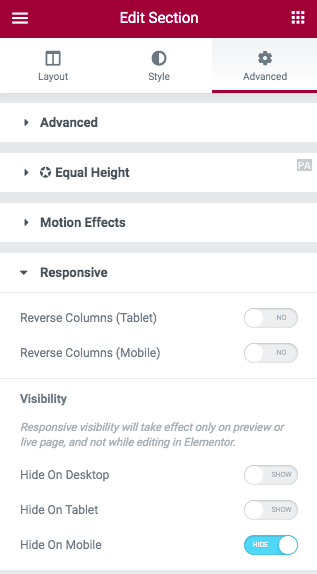
Notice the set of options under “Visibility“? By default, the section is set to be visible on all devices. If you want to hide it, simply toggle the button based on your device.

While you may still see the section when editing the page, it will not be visible on the front end once you publish the page.

To switch the view of the entire web page, all you have to do is click on the responsive mode icon at the bottom of the Elementor control panel.

Elementor-responsive-mode

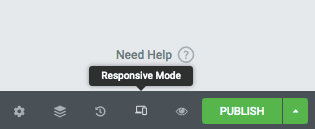
By default, you will notice the mobile view.

Choose-a-device-to-preview-in

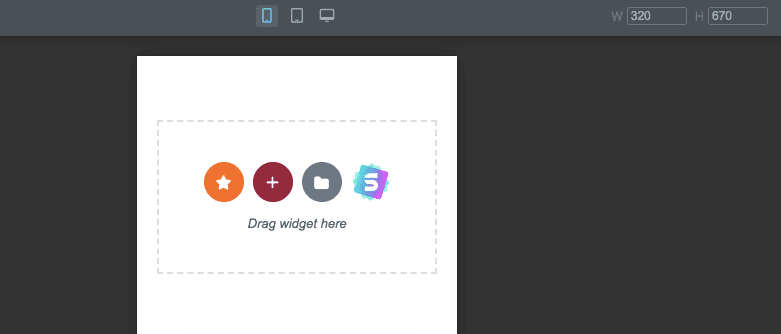
To switch between devices, simply click on the icon of the respective device at the top. And to exit the responsive view, just click on the “X” in the upper right corner.

How easy was it to create a mobile responsive view? Quite easy, right?

9 .Why use Elementor?

Now that we know how to use Elementor, let’s explore a question that’s often asked, but rarely in context. Why should you use Elementor in the first place?

Before we dive into more details, let’s check out this handy infographic that explains some of its advantages.

Reasons why you should use Elementor

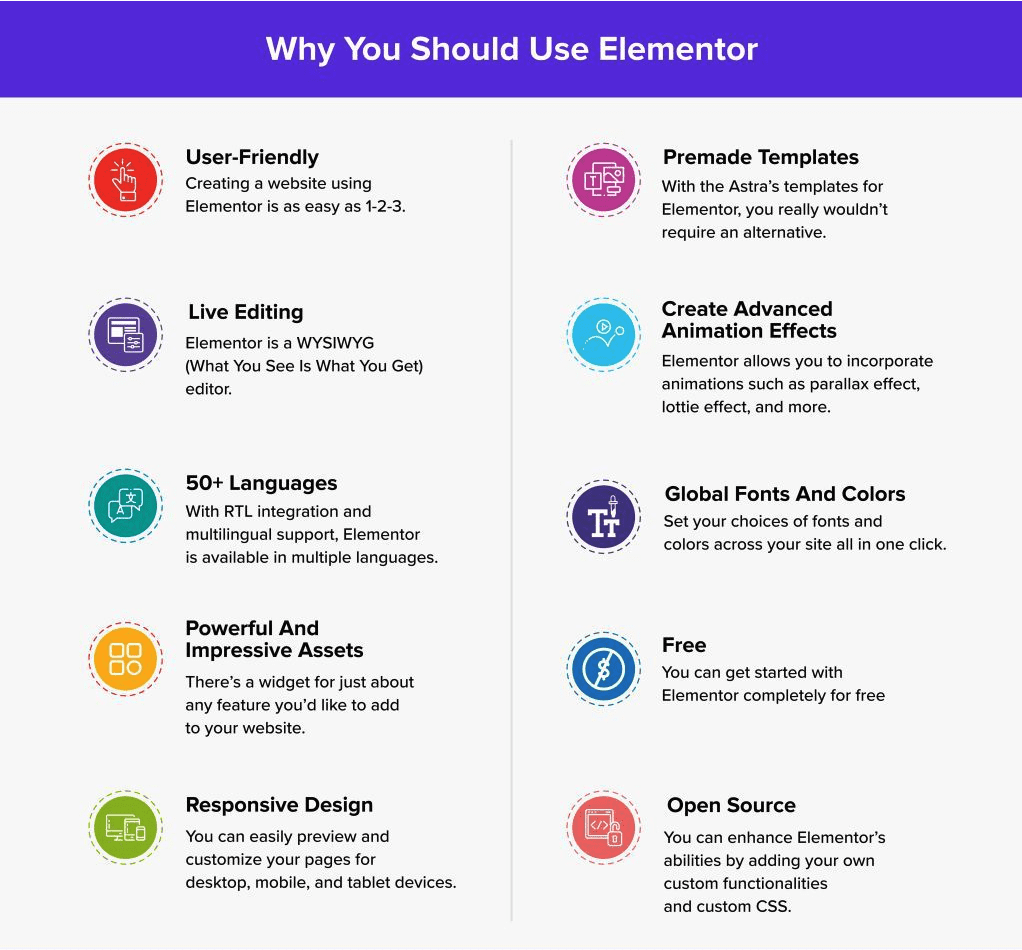
No matter how skilled you are, creating a website can be a challenge. From designing the navigation layout to maintaining the overall aesthetics of the website, it takes time and effort. 

If you’re a freelancer or a web designer, you’re probably aware that with each new client come new challenges and specific requirements. 

Indeed, platforms like WordPress make the entire website development process much easier. Considering this, you always want more. 

Fortunately, you have drag-and-drop page builders like Elementor, which take website development to a whole new level. 

From using a set of widgets and elements to build your web page to impressive blocks and templates, you can do a lot with Elementor. 

Let’s take a deeper look at why you should use the Elementor page builder plugin. 

1. User-Friendly

Creating a website with Elementor is as easy as 1-2-3. By using the drag-and-drop feature, you simply add an executable module or element of your choice, customise it the way you want, and publish the page. It’s as simple as that. You don’t need to know how to code or have programming knowledge.

2. Live editing

Elementor is a WYSIWYG (What You See Is What You Get) editor. With real-time preview, you can see exactly how your page looks after an update, rather than publishing it and then having to redo it if it didn’t turn out the way you wanted.

3. Powerful and impressive assets

Elementor-widgets

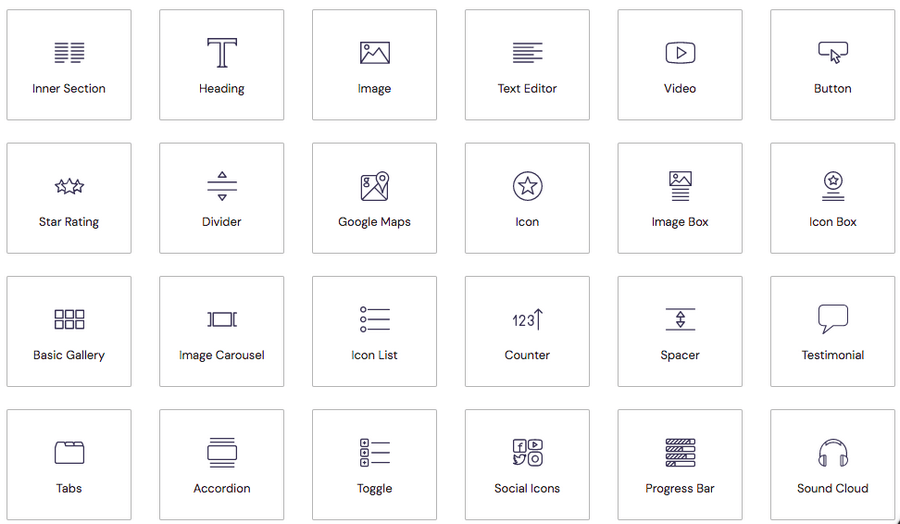
With 90+ amazing widgets (also called blocks) and over 300 design templates, you can unleash your imagination while creating your web pages, landing pages, pop-ups, and more. From headers to buttons, social media icons to galleries and carousels, there are widgets for nearly every feature you want to add to your website.

4. Responsive design

Since over 50% of website traffic comes from mobile devices, it’s crucial to have a mobile-friendly view of your website.

With Elementor, you can easily visualise and customise your pages for desktop, mobile, and tablet devices. Simply switch the view and adjust each element to look perfect on every device. 

5. Global fonts and colours

Set your choice of fonts and colors across your site with a single click. From headings, paragraphs, and even button text, define your brand once and apply it to every element on your website.

6. Ready-made templates

There are ready-made templates regardless of the niche you’re in.

If you’re looking for more options, you can explore the impressive array of templates that Elementor boasts.

7. Create advanced animation effects

Do you love incorporating animations into your website? Do you know those parallax effects, making texts stand out by creating a 3D effect, or even a lottery effect? Elementor allows you to do just that quite easily. 

8. Highly secure

With regular updates, Elementor ensures that your website is in safe hands. They are fully compatible with WordPress security standards and remove any malicious content when necessary.

9. 50+ languages

With RTL integration and multilingual support, Elementor is available in multiple languages. Use the platform in your preferred language.

10. Seamless integration with WordPress plugins

Whether it’s WooCommerce, LearnDash, Yoast SEO, MemberPress, and many more, Elementor is compatible with popular WordPress plugins. 

11. Open source

While it might require some coding on your part, you have full access to Elementor’s source code. You can enhance Elementor’s capabilities by adding your custom functionalities and personalised CSS. 

12. Revision history

If you’ve been coding for a while or even using Google Docs for that matter, you’ll agree that the undo and redo feature is a massive blessing. Whether you’ve deleted a line of code or an entire code block, a simple undo can take you back to where you started.

With Elementor’s revision history, your entire page creation process can be easily traced.

We don’t see any reason to abandon Elementor, but just in case you want to switch to an alternative, your website will continue to work. Unlike some page builders, you’re not locked into shortcodes when using Elementor.

14. Active community

Elementor-community

With Elementor, you are not alone. Thanks to the tremendous popularity of the Elementor plugin, there is a growing community you can connect with.

You can continually learn and expose yourself to new tools, design ideas, and much more. Not to mention, the community is there to support you if you need help, suggestions, and ideas for creating an awesome website.

15. Free

Last but not least, you can start with Elementor completely for free. While there is a professional version, as mentioned earlier in the article, the free version should serve you well.

10. Pros and cons of using Elementor Page Builder

Like everything else, Elementor has its pros and cons. Although the pros outweigh the cons, we have listed them here for you.

Pros of Elementor Page Builder

Cons of Elementor Page Builder

Simple and intuitive interface

You must upgrade to a Pro version for support

Drag and drop page builder

No lifetime pricing option

Easily customize pages for different devices (desktop, tablet, mobile)

Instances of slow page loading

Real-time live previews during editing


90+ widgets, more than 300+ templates and several blocaks to choose from


Seamless integration with third-party tools


Protect with regular updates


Create custom themes, attractive popups and animations


Compatible with all themes


Integrates perfectly with WooCommerce


The free version works well


Final thoughts

Wow, we’ve covered a lot in this WordPress Elementor tutorial!

In terms of key takeaways, I hope you can understand why Elementor is a fantastic page-building tool that takes much of the guesswork out of web design. It strikes the perfect balance between user-friendliness and deep functionality, making it one of the most accessible page builders available for WordPress.

Victoria Pencheva
About the author
Call Now Button